
Durable and weather-resistant DIY garden furniture made from autoclaved pine beams, cut to size, shaped, and connected with pins exposed to weather and sunlight, especially if left in its natural state, tends to turn gray and look old and worn: impregnation used as a finish coat is not enough, the surface protection cracks after a while and opens the way for agents that destroy the material.
To make durable DIY garden furniture, it is necessary to use woods especially suitable for outdoor use, which are not exactly economical, but good results can also be obtained from conventional autoclaved woods: the high pressure they are subjected to during the impregnation process makes the products to penetrate deeply so that the tree becomes impregnable throughout its mass.
For the manufacture of our DIY garden furniture, we can use first-grade pine wood, free of knots, stained as you wish with transparent or opaque products: it is obvious that the finish must be of high quality and durable.
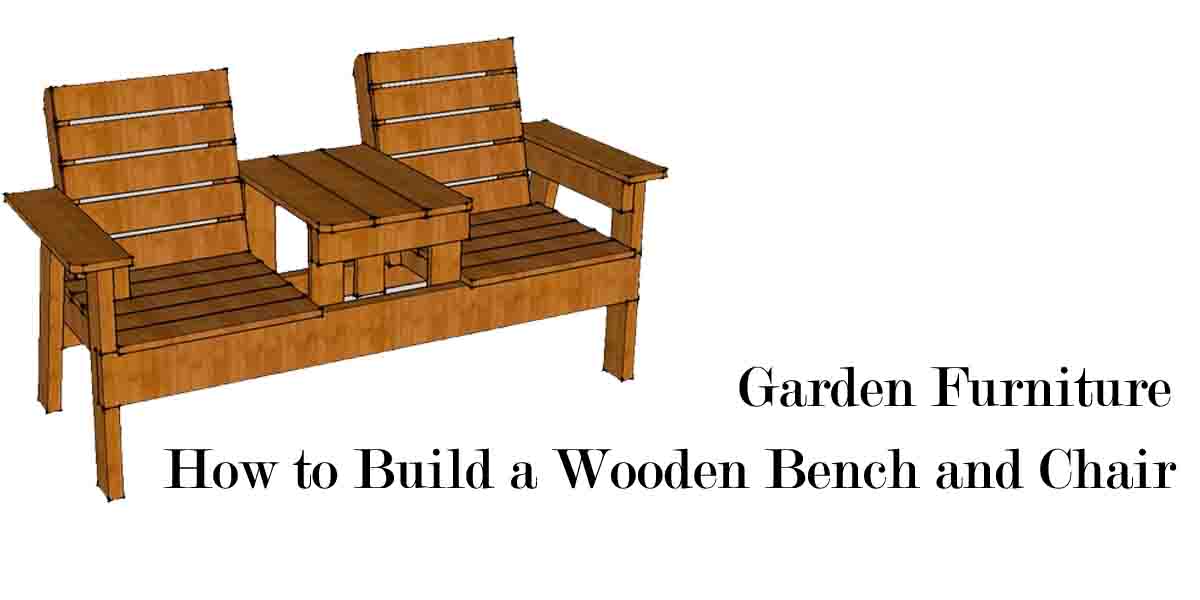
Let’s break down the step-by-step construction of DIY garden furniture, starting with the bench, and then analyze the chair
wooden bench construction
- Everyone can make all straight cuts according to the available equipment, even by hand: a frame cutter box is enough to guide the hand saw blade accurately.
- Beveled cuts, such as cuts touching the ends of the back logs (100°), are made by setting the correct angle, as shown in the drawing, with a false square on one side of the beam and continuing on the two opposite sides of the perpendicular line that the blade should support.
- incision made
- The front legs at the top should be shaped to reduce the thickness from 70mm to 57mm by chamfering the area between the two thicknesses. Also, a drawing on a 1:1 scale is indispensable for this operation, since it allows you to mark the main reference points of the form on the tree and subsequently check, by applying the rail to the panel, the correctness of the development. Using a jigsaw with a blade overhang of more than 70 mm, you can quickly sketch out the shape.
- It is more difficult, if you focus only on the profile reproduced on the chipboard, to accurately obtain the concavity on the upper surface of the armrests and on the side slats on which the seat slats rest.
- To do this, you need to make two templates on cardboard, always on a 1: 1 scale, which you need to cut out and use as a reference for tracing the curvature on the rails; to do this, you can reproduce the drawings below, remembering that each square should have a size of 5 cm on each side.
Adjust bench profiles and prepare joints
- Following the line drawn with the template on the armrests and seat crossbars, saw off the excess wood and align the cut as you did for the front legs. For the 3 pieces that support the seat posts, the end that connects to the backrest beam (the one with the holes for the dowels) must be bevelled at 105° so that the backrest remains slightly tilted back in a horizontal position when assembled.
- All bulges remaining after cutting must be eliminated until a correct, gradual and smooth concavity is obtained (especially for armrests). In this case it is also possible to proceed by hand, winding sheets of sanding paper, with a gradual finer grain, on a wooden heel. Obviously, having a grinder saves time and grease.
- Sharp edges are the enemy of aesthetics on their own, but on some parts of the bench they should be eliminated for comfort. Some elements, such as the armrests and the front of the seat, on the outward-facing edge, must be beveled in succession with a concave profile cutter, as these are the raised parts that the body contacts most easily when seated. In addition, a sharp edge visually emphasizes any irregularities in the development of curved shapes, while corner milling tends to minimize them. However, this concept applies to all other elements for which it is sufficient to simply break the corner.
- Considering that the whole construction involves only two sizes of beams, the preparation of most dowel locations can be facilitated by using two wooden heels cut from a 70x70mm beam and a 70x45mm beam. By drilling well-centered Ø 10 mm through holes on both beams, two blanks are obtained, which, aligned on the heads of the corresponding beams and clamped with clamps, allow the holes to be accurately reproduced without re-marking.
- To mark the drilling points on the sides of the parallel beams (posts, stringers, brackets, etc.), markers with nozzles of the same diameter as the dowels are used.
- All you have to do is place the part with the dowel markers exactly next to the competing part and apply pressure: the sharp edges penetrate the wood, marking exactly where you need to drill. Even if you don’t see it in the photo, the pairing of the two elements must be done with a straight strip to make sure the pieces are perfectly aligned.
- With a little care, holes can also be opened with a free hand drill; Surely the column support and depth gauge will make you feel more comfortable.
- With a compass set to a radius of 35 mm, pointing at the center of the arm section, a rounding is drawn.
- cut the excess with a jigsaw and sand the DIY garden furniture pieces.
Build in Sequence
- Start by assembling the T formed by the upper backrest beam and B-pillar. Pairs of dowels are inserted from one side of the central vertical, and 5 horizontal strips of one half of the back are simply passed through them; then the corresponding lateral vertical is prepared with dowels inserted (an extra pair to connect to the beam) and everything is packed, tightened between long clamps or tension straps. In both cases, the wood must be protected from contact with the clamping element by placing a piece of soft material or plywood underneath.
- When the glue has hardened, the clips are removed and the second half is completed in the same way.
- When using long clamps, it must be taken into account that the posts and the top beam have a rounded top, so when installing and fixing the bottom beam to the structure, the clamps do not have the ability to provide an effective grip without the risk of slipping. Either you have straps or you have to shape two or three pieces of wood for this purpose.
- Finally, E, which is the support for the seat slats, is mounted on a structure already prepared and stabilized separately. The back center post must be drilled to accommodate 5 beams on each side, which is the equivalent of making 20 dowel holes (10 on one side and 10 on the other). After marking the correct distance between the centers of the beams and marking the points for drilling on one side, there is no need to repeat the operation on the other side: if you have a core drill or a reliable support, the holes can be drilled through by inserting one long protruding pin into each of them at both sides. This ensures that the beams of each half are perfectly aligned. In fact, this trick only applies to the first 4+4 rafters, starting from the top:
On all elements that must be rounded at the head (armrests and back posts) or along the profile (upper back stringer), this operation is carried out after drilling holes for the pins and checking the conformity of the joints: rounding freshly cut parts will make it difficult to accurately copy the edges and expose the joints skew.
The most difficult part to obtain a permanent rounding is the spar, since it is necessary to machine its entire length: in this case, the material is removed by hand planing, with great care.